QGIS cookbook
Table of contents
Getting Help 🚑
Before reaching out, make the sanity test:
- QGIS is updated (please try switching from LTR to latest)
- Fire2a toolbox is updated (
Menu : Plugins > Manage and Install Plugins... > Installed > Fire Analytics Processing-Toolbox > Upgrade) - Your Operating System (OS e.g. Linux, Windows, MacOS) is updated
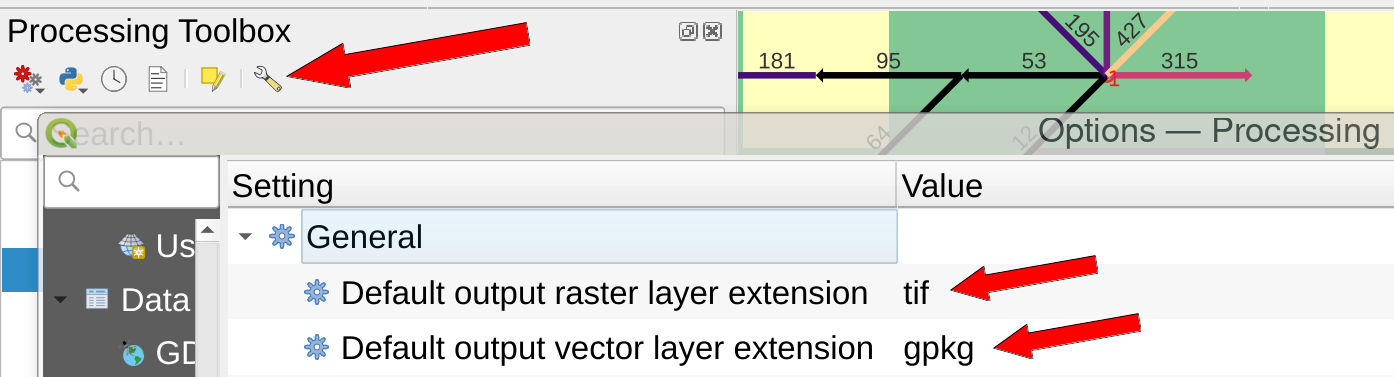
- No funny formats in
Options > Processing > default raster & vector layers, set to tif & gpkg
- Restart your computer and try again on a fresh QGIS project on a directory that is not shared (no OneDrive, GoogleDrive, network drive, etc.) and has no spaces in its name
If the problem persists, follow the next steps to create an issue here:
-
Look for similar issues beforehand
- Identify your OS, Fire2a toolbox plugin, and QGIS versions:
- Operating System:
– Windows :press Win key > type About > Windows specifications section : click Copy button
– MacOS :Apple > TODO
– Linux:$ uname -a - Plugin Version: Navigate to
Plugins > Manage and Install Plugins... > Installed > Fire Analytics Processing-Toolbox > Installed version.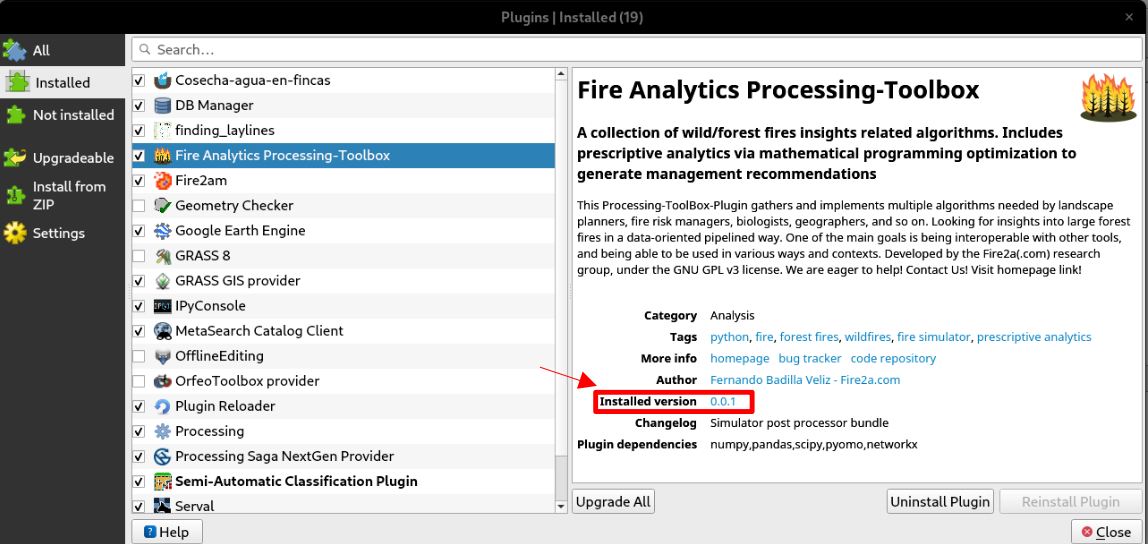
- QGIS Version:
Menu :Help > click Aboutcopy at least the first paragraph
- Operating System:
- Include Relevant Files:
- Compress and attach the instance and/or results (make a
.zipfile) you were using when the error occurred. - If not already in results, attach the corresponding
algorithmName_log.htmlfile (Menu : View > Panels > Log Messages > fire2a)
- Compress and attach the instance and/or results (make a
Clear and concise descriptions are paramount when submitting a bug report. Please focus on details about the issue encountered, including your goal and the unexpected behavior you experienced. Then, provide the steps to reproduce the issue. Include any error messages or other relevant observations you encountered.
 Plugin Management
There are 3 ways of installing plugins, the recommended (using a our custom repo source) takes care of prompting the user in QGIS’s message bar for updates. “Install from ZIP” is for testers looking for beta versions, and “placing a directory” is for developers symlinking their repo.
Install fire2a toolbox
(check explainer gif after for steps 3 and 4)
- Install QGIS for Linux🗽, MacOS or Windows
English language version is more reliable
Don’t open it yet!
Decision Optimization algorithm users beware: At the moment (May 1st 2024, and for the last year), IBM has not released a python >3.10 compatible version. So QGIS<=3.36.0 is required for using CPLEX (CBC is included and works fine except for large rasters) - Install python dependencies for Linux🗽, MacOS, Windows … or last resort
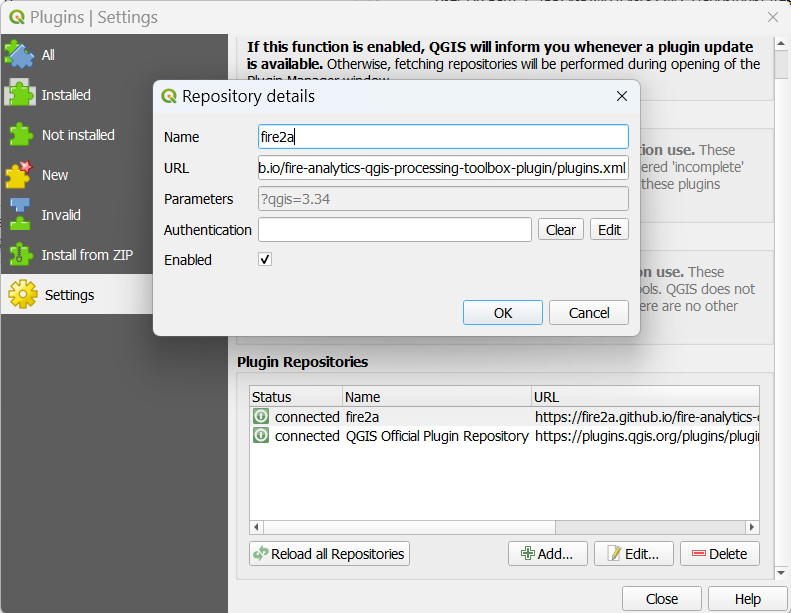
- Add fire2a’s plugin repo/store URL to custom plugin sources (open here!)
- tutorial
Menu: 'Plugins' > 'Manage and Install Plugins...' > 'Settings' > Plugin Repositories 'Add' > fill Name & paste URL > Ok
- Note: removing the repo server does not uninstall its plugins
- Do a regular new plugin installation
- tutorial
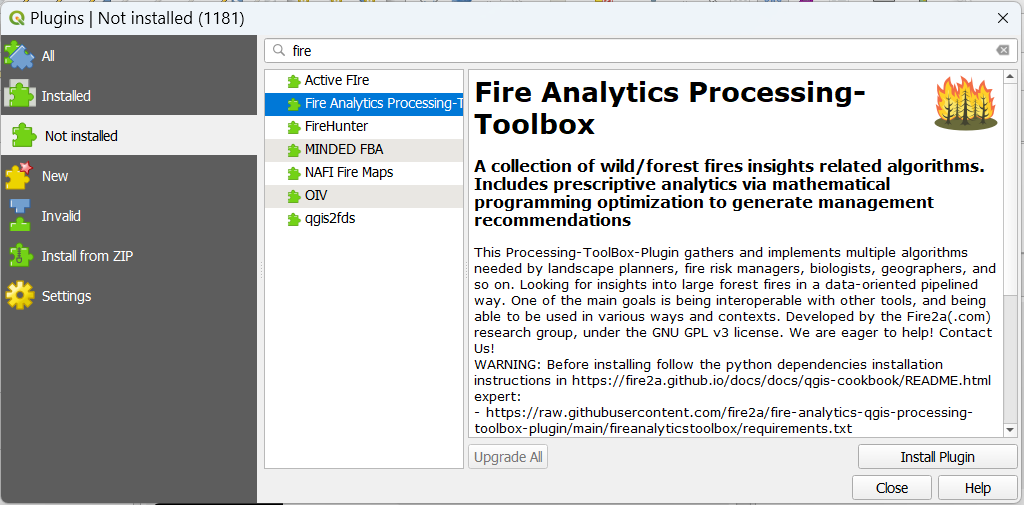
Menu: 'Plugins' > 'Manage and Install Plugins...' > 'Not installed' > search box 'fire' > select > 'Install Plugin' > 'Ok'- Note: At the time of writing the
Plugin Dependencies Managerwait wheel spins forever, pressOkrightaway; you already installed them in step 2 - If it doesn’t appear right away on the Processing Toolbox panel:
A. toggle the checkbox next to its name in theInstalledsection of thePlugin Manager
B. restart QGIS
Other options
Install from ZIP
- Browse to:
- Download a release from a tag section, in the Assets part, it looks like
fireanalyticstoolbox_v1818.5.5-beta.zip Menu: 'Plugins' > 'Manage and Install Plugins...' > 'Install from ZIP' > '...' > 'Install Plugin'(also dropping the zip into the input works)
Place a folder
Download & unzip a release from the repo toolbox-releases or sample release sections.
For example, unzip example_plugin_v1.2.3.zip, inside, a folder named example_plugin must be moved to:
# linux (symbolic link it!)
~/.local/share/QGIS/QGIS3/profiles/default/python/plugins/example_plugin
# macos
~/Library/Application Support/QGIS/QGIS3/profiles/default/python/plugins/example_plugin
# windows
%APPDATA%\QGIS\QGIS3\profiles\default\python\plugins\example_plugin
Must have plugins!

- Save All, choose a location, name a new directory, done! everything gets written to disk, never worry again about temp folders or in memory layers!

- Serval, Modify your rasters as if you were using paint!

- IPyConsole, “No offense, but QGIS python console just sucks.” (sic) documentation, fix to use latest qtconsole

- Plugin Reloader, If a plugin starts misbehaving easier to reload it than to restart QGIS

- Plugin Builder, Jumpstart your plugin development!
Linux 🗽
QGIS install
- On Debian getting the Long Term Release is easy as:
- Gnome:
Super (or Meta) Key > type 'QGIS' > Click 'Install' on the Software app dialog - Synaptic: search for qgis, click install
- Terminal:
sudo apt install qgis qgis-plugin-grass
- Gnome:
- Getting the Latest Release on Debian: add QGIS apt source
- Other distributions
Python
sudo pip is insecure and may break your system!
expert tl;dr: -m venv --system-site-packages -r requirements.txt, requirements.dev.txt
setup a virtual environment
Handle separate dependencies but share system packages because installing QGIS brings addional packages through python3-qgis that binds c binaries such as GDAL.
- Download requirements.txt list (2ndary clicking the link and Save Link As…)
- Open a terminal
# good practice: a directory to keep all venvs
mkdir -p ~/pyenv
# recommended: name this venv qgis
python3 -m venv --system-site-packages ~/pyenv/qgis
# activate it
$ source ~/pyenv/qgis/bin/activate
# from activated venv, upgrade tools
(qgis) $ python -m pip install --upgrade pip wheel setuptools
# install requirements (check where you saved it)
(qgis) $ pip install -r ~/Downloads/requirements.txt
# related bug: matplotlib can't find qt backend
(qgis) $ pip install --upgrade matplotlib
usage: activate venv, launch qgis
$ source ~/pyenv/qgis/bin/activate
(qgis) $ qgis
handy terminal aliases
# appending to .bashrc:
echo 'alias pyqgis="source ~/pyenv/qgis/bin/activate"'>>~/.bashrc
echo 'alias myqgis="source ~/pyenv/qgis/bin/activate && qgis"'>>~/.bashrc
# NOTE: must source bashrc for aliases to work
$ source ~/.bashrc
# NOTE: or restart same shell (every time a bash terminal is launched it gets sourced)
$ bash
# first alias: to activate venv
$ pyqgis
# second alias: to launch with venv activated
$ myqgis
activated icon desktop environment launcher
Avoid ModuleNotFoundError when QGIS starts from the default launcher or associated (i.e. Open with) files (e.g., .shp, .gpkg), by activating the venv before starting QGIS
To do this, edit the QGIS icon launcher. Some Desktop Environments (xfce, gnome?) allow editing the launcher by 2ndary clicking on the QGIS icon; then edit the launch command on the displayed menu:
# From
Exec=qgis %F
# To
Exec=bash -c 'source ~/pyenv/qgis/bin/activate && qgis %F'

# It's the same as editing this file
~/.local/share/applications/org.qgis.qgis.desktop

# If not found on your user's files it's on system launchers, copy it:
cp /usr/share/applications/org.qgis.qgis.desktop ~/.local/share/applications/.
# then edit
locations
# user plugin directory
~/.local/share/QGIS/QGIS3/profiles/default/python/plugins/example_plugin
# processing plugin directory
/usr/share/qgis/python/plugins/processing
MacOS 💰
QGIS Install
Download it here also read the instruction to not get security blocked at startup.
Python
This QGIS version includes its own python, so be careful to use it instead of systems’s python
# optional or pro: be extra careful confirming is the right python
# these are not the same:
% ./python3 -c "import sys;print(sys.prefix)"
% python3 -c "import sys;print(sys.prefix)"
installing requirements
- Download requirements.txt list (2ndary clicking the link and Save Link As…)
- Open a terminal
# go to QGIS python location
% cd /Applications/QGIS.app/Contents/MacOS/bin
# install into qgis python environment
% ./python3 -m pip install -r ~/Downloads/requirements.txt
# matplotlib bug: can't find qt_backend
% ./python3 -m pip install --upgrade matplotlib
locations
# user plugin folder
~/Library/Application\ Support/QGIS/QGIS3/profiles/default/python/plugins/example_plugin
# python location
/Applications/QGIS.app/Contents/MacOS/bin
Windows 💩™
QGIS Install
A. Web install link, there are 3 flavors:
- Latest version is recommended
- LTR works with some issues
- OSGeo4W Network Installer can be upgraded in place
B. “Terminal” install
- Using
wingetcli, if not available, activate it in Microsoft Store - Open a “privileged terminal”, e.g. On your keyboard press the ‘Win’ button > type ‘cmd’ > 2dary click on the app > Click ‘Run as administrator’
- Input
winget install -e --id OSGeo.QGIS --scope machine(--scope machineoption is recommended to making launcher icons for all users) - Follow on screen instructions (all defaults are ok)
Python
Windows version of QGIS comes bundled with its own python, a special launcher must be used to access it
installing requirements
- Download requirements.txt list (2ndary clicking the link and Save Link As…)
- Activate QGIS python by starting
OSGeo4W ShellappWin button > type OSGeo > select & clickto launch a CMD terminal - Type
pip install -r "%USERPROFILE%\Downloads\requirements.txt"press Enter. (Adjust the path as needed, on Windows 11 you can select the file with the secondary button then click ‘Copy path’, use 2ndary click to paste into CMD terminal)

If you couldn’t understand last 2 steps, try the last resort solution.
All ready!
Except if you’ll be running our Decision Optimization algorithms, specially on big rasters; then the next two steps are required to use CPLEX as a MIP solver from within QGIS.
make it writable
Recommended for machines with a single user, or to share modifications to the environment to all users (explainer gif after)
Also to integrate a local cplex install with QGIS python environment (see our decision optimization algorithms)
- Open QGIS install folder, open the
binfolder- probably:
C:\Program Files\QGIS 3.45.6\bin(adjust version) - surely:
Win button > type QGIS > 2ndary click > Open file location > 2ndary click > Open file location > click 'bin' folder
- probably:
- Select
Python39(check same version), properties, security, … full control for user.

Also on the gif, a success install of qtconsole being installed on Program Files\Qgis and not on user’s %APPDATA% path, meaning success in making the python environment writable
setup CPLEX solver
At the moment (May 1st 2024, and for the last year), IBM has not released a python >3.10 compatible version. So QGIS<=3.36.0 is required.
- Make your QGIS python environment writable by users (see previous section)
- Download and install the CPLEX solver from IBM’s website (tested with CPLEX_Studio2211)
- Open OSGeo4W Shell
- Execute changing directory to the CPLEX install location, python folder, then run setup.py with the install argument:
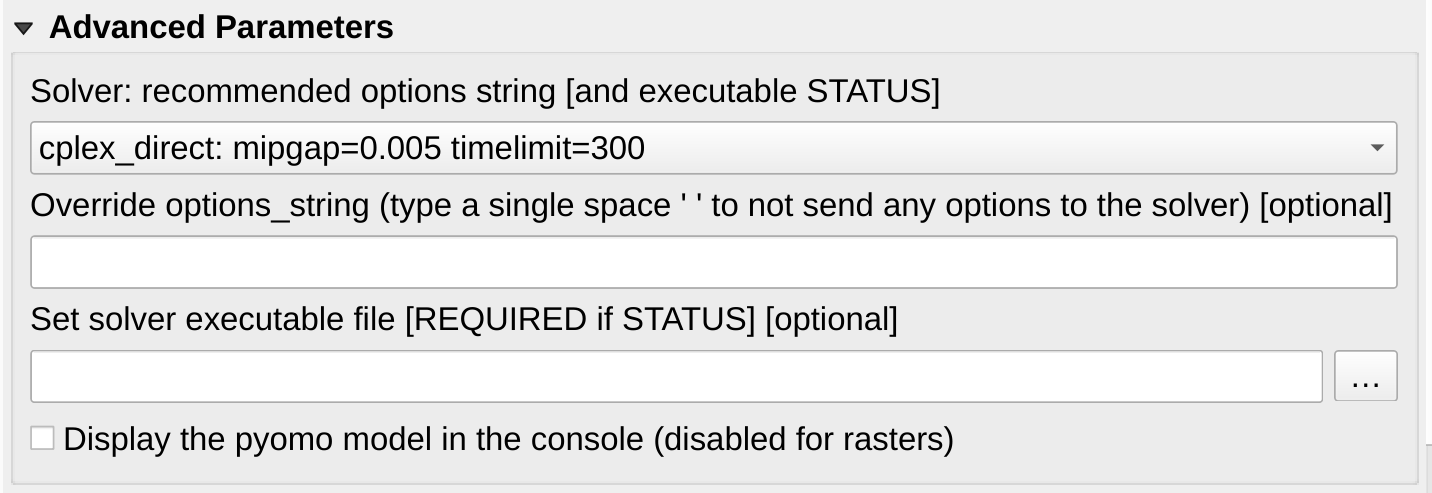
cd ..\IBM\ILOG\CPLEX_Studio2211\python
python setup.py install
Now you can just select CPLEX on any decision optimization algorithm (advanced parameters section, on the dropdown form)
making a python environment launcher for developers
To have a location independent launcher that activates the environment in a CMD terminal;
- for running python scripts using QGIS without the application raised
- that could be chained into VSCode for development .vscode\settings.json
Copy and modify python-qgis.bat that comes in QGIS bin folder, in these 3 steps (explainer gif after, sample):
- Open QGIS install folder, open the
binfolder- probably:
C:\Program Files\QGIS 3.45.6\bin(adjust version) - surely:
Win button > type QGIS > 2ndary click > Open file location > 2ndary click > Open file location > click 'bin' folder
- probably:
- Copy and rename
python-qgis.batto a location and name of your choosing - Edit the 2nd and last line with:
 REM call it from an absolute path
 REM adjust location and version
 call "%PROGRAMFILES%\QGIS 3.45.6\bin\o4w_env.bat"  (adjust version)

 REM print the prefix as check
 echo python sys says:
 python -c "import sys; print('prefix:', sys.prefix, '\npath:', sys.path)"
 REM leave the terminal running
 cmd.exe /k