Table of contents
tl;dr:
- prefer the latest over the LTR (long term release) of QGIS
- Linux: setup an system aware python virtual environment for QGIS
- MacOS: use the bundled python directly
- Windows:
WSL»OSGeo4W installer»Standaloneinstaller- make your python environment writable
- use the bundled python directly
LTR vs Latest
QGIS has two versions: Long Term Release (LTR) and Latest. The LTR may be the most stable version, but lacks new features that the Latest version has. But also QGIS relase schedule moves very fast (every 3 or so months), so there’s no much point into supporting old versions for long.
At the time of writing we support 3.36.2 and up.
Linux 🗽
- Official QGIS install tutorial
- Make a system aware python virtual environment for QGIS:
# required to create venvs sudo apt install python3-venv python3 -m venv --system-site-packages ~/pyvenv/qgis # ~/pyvenv/qgis is just an example, used from now onwards # the --system-site-packages flag allows the usage of GDAL, PyQt5, SIP and other QGIS dependencies - Usage: activate before launching qgis
source ~/pyvenv/qgis/bin/activate qgis - Customize QGIS’s application “icon” launcher for ease of use:
  # make a user copy
  mkdir -p ~/.local/share/applications
  cp /usr/share/applications/org.qgis.qgis.desktop ~/.local/share/applications/org.qgis.qgisvenv.desktop

  # edit the sections in
  nano ~/.local/share/applications/org.qgis.qgisvenv.desktop
  # rename the launcher (as you wish)
      Name=fire2a QGIS Desktop

  # activate the python environment
      Exec=bash -c 'source ~/pyvenv/qgis/bin/activate && qgis %F'

  # + make local binaries available (usually user local binaries not in PATH)
  # do you even have a ~/.local/bin?
      Exec=bash -c 'export PATH=$HOME/.local/bin:$PATH && source ~/pyvenv/qgis/bin/activate && qgis %F'

  # + all logs for developers
      Exec=bash -c 'export PATH=$HOME/.local/bin:$PATH && source ~/pyvenv/qgis/bin/activate && qgis %F | tee -a /tmp/qgis.log'
      Terminal=true

  # if the icon not showing right away
  update-desktop-database ~/.local/share/applications/
MacOS
- Official QGIS install tutorial
Windows
Our recommendation priorities: Use the linux subsystem for windows (WSL), else the OSGeo4W installer, else the standalone installer.
Some algorithms (DPV) don’t parallelize in Windows; the standalone installer doesn’t update, so upgrading is slow! Using the bundled python is difficult -it can’t even make a virtual environment to isolate different plugins! So WSL FTW!
Windows Subsystem for Linux (WSL2)
Official guide, nevertheless here are the main steps for setting up Debian with QGIS:
- Prerequisites: Windows 10 Build 19044+ or Windows 11 (for WSL2 with GUI)
- Virtualization must be enabled (usually is, but restart to bios or uefi to setup and check, else the next step will fail)
- Activate the Windows Subsystem for Linux (WSL) additional feature (Start > Search >
Turn Windows features on or off> checkboxWindows Subsystem for Linux, needs restarting) -
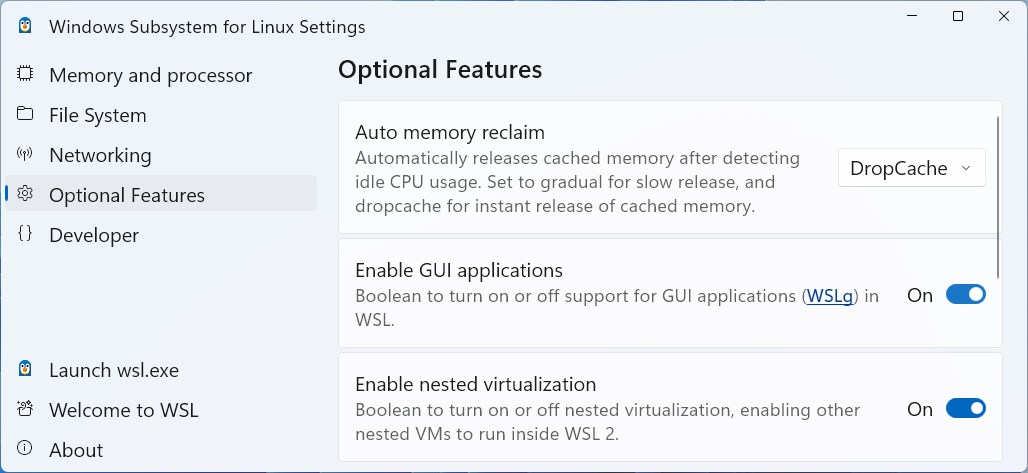
On the WSL Settings App, make sure
gui appsis enabled and, if needed, set maximum shared space less than the 1TB default
- Install Debian (more reliable than Ubuntu) Linux distribution from the Microsoft Store or type in PowerShell
wsl --install -d Debian - Install the graphic drivers for gui apps (Open Debian from the Start menu) Also there’s an Ubuntu variant, read below!
 # Update and upgrade the system (tip: repeat monthly)
 sudo apt update && sudo apt upgrade -y

 # Install the graphic drivers by allowing all firmware packages, editing the sources file:
 sudo nano /etc/apt/sources.list.d/debian.sources

 # Add 'contrib', 'non-free' and 'non-free-firmware' to the 'Component' section
 #   of the trixie and trixie-update suites, e.g., change:
 Types: deb
 URIs: https://deb.debian.org/debian
 Suites: trixie trixie-updates
 Components: main contrib non-free non-free-firmware  # <-- ADD HERE
 Signed-By: /usr/share/keyrings/debian-archive-keyring.gpg

 #   to save and exit the nano editor: Ctrl+O, Enter, Ctrl+X

 # Update and install the drivers
 sudo apt update && sudo apt install firmware-linux firmware-linux-nonfree -y
 sudo reboot

 # Test the drivers
 sudo apt install x11-apps
 xeyes
5.U If using Ubuntu or older debian versions, they use the older apt sources list formats
sudo nano /etc/apt/sources.list # append at the end of the lines # for older Debian Bookworm # add 'contrib', 'non-free' and 'non-free-firmware' deb http://deb.debian.org/debian bookworm main contrib non-free non-free-firmware # for Ubuntu # add 'restricted', 'universe', 'multiverse' deb http://archive.ubuntu.com/ubuntu jammy main restricted universe multiverse - Check this tutorial, tl;dr:
- Linux programs should work over linux locations, mixing windows locations is slow
- linux path
/home/<user name>is equivalent to\\wsl$\debian\home\<user name>in windows /mnt/c/Users/<user name>/is equivalent toC:\Users\<user name>\- use the
explorer.exe .command to open a file explorer in the current directory
-
Now you can install QGIS as in the linux section
- Windows icon to launch QGIS: Create a batch file, e.g.,
Desktop\launch_qgis.batwith the following content:@echo off wsl -d Debian -- bash -c "source ~/pyvenv/qgis/bin/activate && qgis"
OSGeo4W installer
- Official OSGeo4W installer guide
- QGIS gets installed in
C:\OSGeo4W\bin\qgis-bin.exe - To use QGIS’s python you must open the OSGeo4W shell and activate the environment, this is the wrapper:
  C:\OSGeo4W> cd bin
  C:\OSGeo4W\bin> python-qgis.bat
  >>> exit()
  REM now the python environment is fully set up
  REM but this environment forgets about the user's PATH so git or cplex won't be available
Standalone installer
- Official QGIS standalone guide
- QGIS gets installed in
C:\Program Files\QGIS 3.40.2\bin\qgis-bin.exe. The downside is that the version varies with every update, needing full reinstallation (use OSGeo4W if you want quick auto updates and no path changes) - To use QGIS’s python you must open the OSGeo4W shell and activate the environment, this is the wrapper:
  C:\Program Files\QGIS 3.40.2\> cd bin
  C:\Program Files\QGIS 3.40.2\bin\> python-qgis.bat
  >>> exit()
  REM now the python environment is fully set up
  REM but this environment forgets about the user's PATH so git or cplex won't be available